Creating and Editing Queries
To make a new query, click Create in the navbar then select Query.
Query Editor
Query Syntax
In most cases we use the query language native to the data source. In some cases there are differences or additions, which are documented on the page.
PayСore.Analytics uses SQL (Structured Query Language) for creating queries.
Keyboard Shorcuts
- Execute query: Ctrl+Enter or Cmd+Enter
- Save query: Ctrl+S or Cmd+S
- Toggle Auto Complete: Ctrl+Space
- Toggle Schema Browser Alt+D or Option+D
Schema Browser
To the left of the query editor, you will find the Schema Browser:
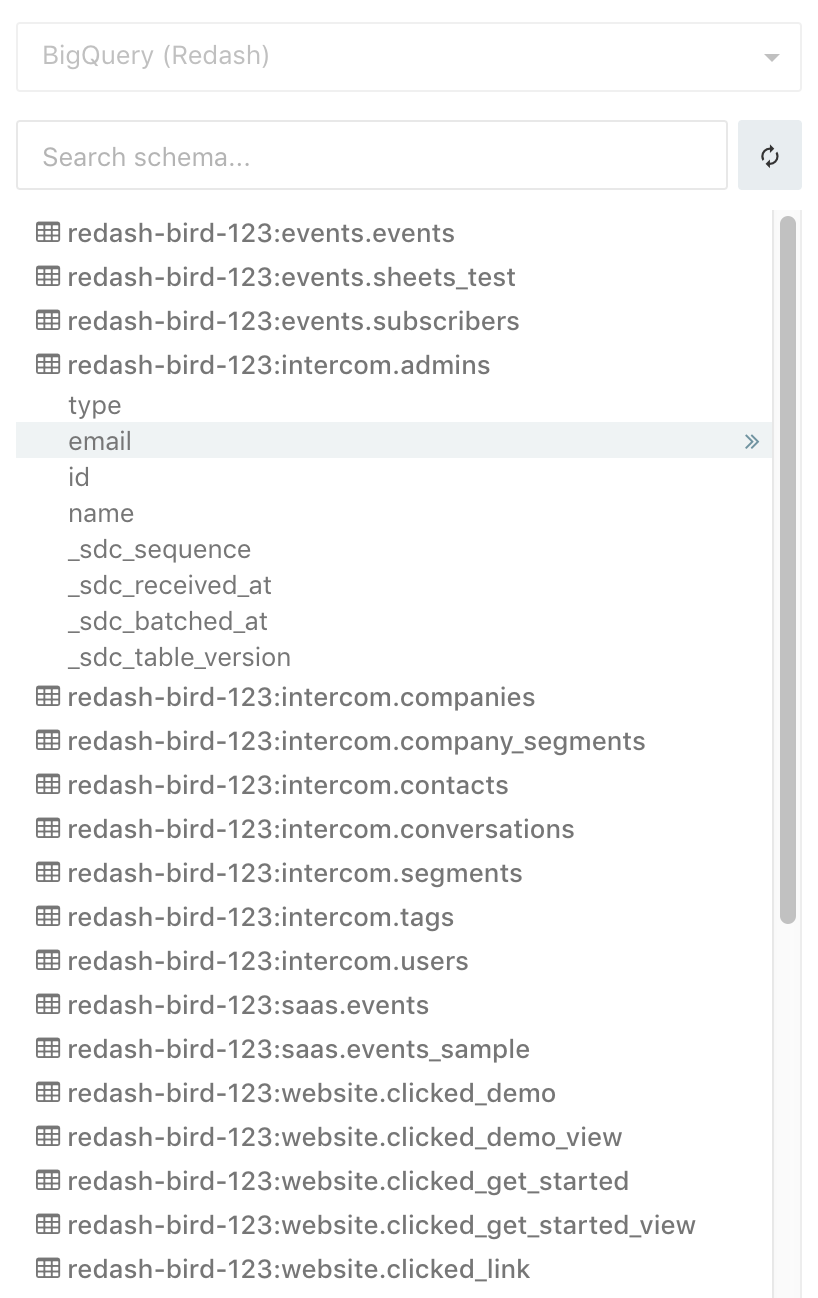
The schema browser will list all your tables, and when clicking on a table will show its columns. To insert an item into your query, simply click the double arrow on the right side. You can filter the schema with the search box and refresh it by clicking on the refresh button (otherwise it refreshes periodically in the background).
Please note that not all data source types support loading the schema.
You can hide the Schema Browser using the key shortcut or by double-clicking the pane handle on the interface. This can be useful when you want to maximize screen while composing a query.
Auto Complete
The query editor also includes an Auto Complete feature that makes writing complicated queries easier. Live Auto Complete is on by default. So you will see table and column suggestions as you type. You can disable Live Auto Complete by clicking the lightning bolt icon beneath the query editor. When Live Auto Complete is disabled, you can still activate Auto Complete by hitting Ctrl+Space.
Live Auto Complete is enabled by default unless your database schema exceeds five thousand tokens (tables or columns). In such cases, you can manually trigger Auto Complete using the keyboard shortcut.
Auto Complete looks for schema tokens, query syntax identifiers (like SELECT or JOIN) and the titles of Query Snippets.
Query Settings
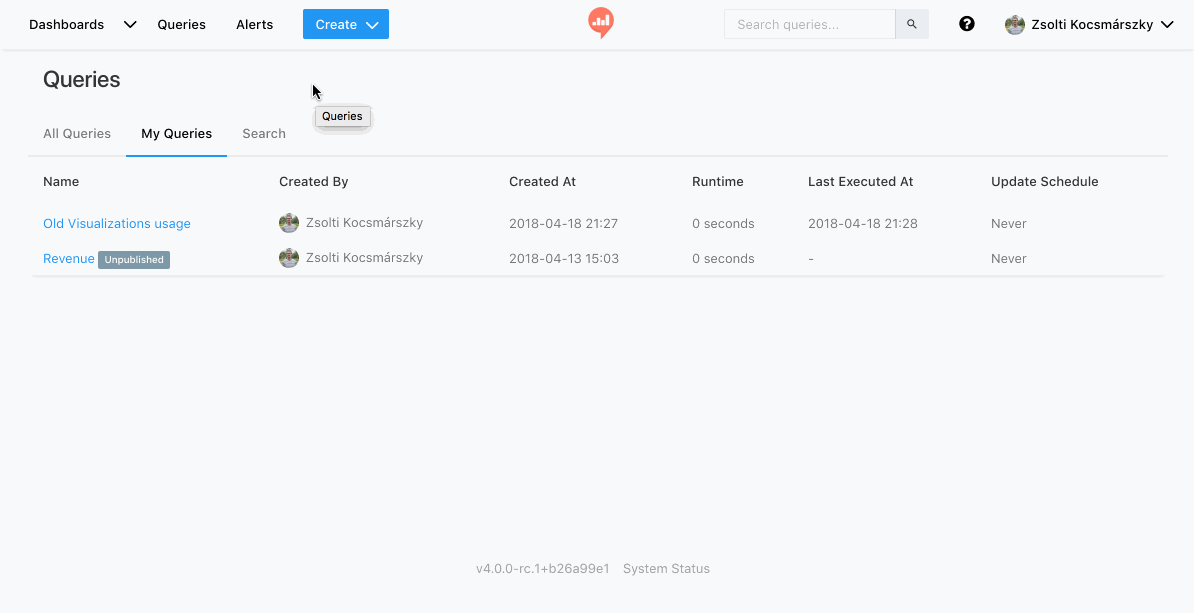
Published vs Unpublished Queries
By default each query starts as an unpublished draft, which means that:
- Only the user who created this query can see it in the "All Queries" list or in search results.
- You can't add visualizations from an unpublished query to dashboards or use it in alerts.
To publish a query, give it a name or click the Publish button. It's also possible to unpublish a published query by clicking on the Unpublish button in the query menu.
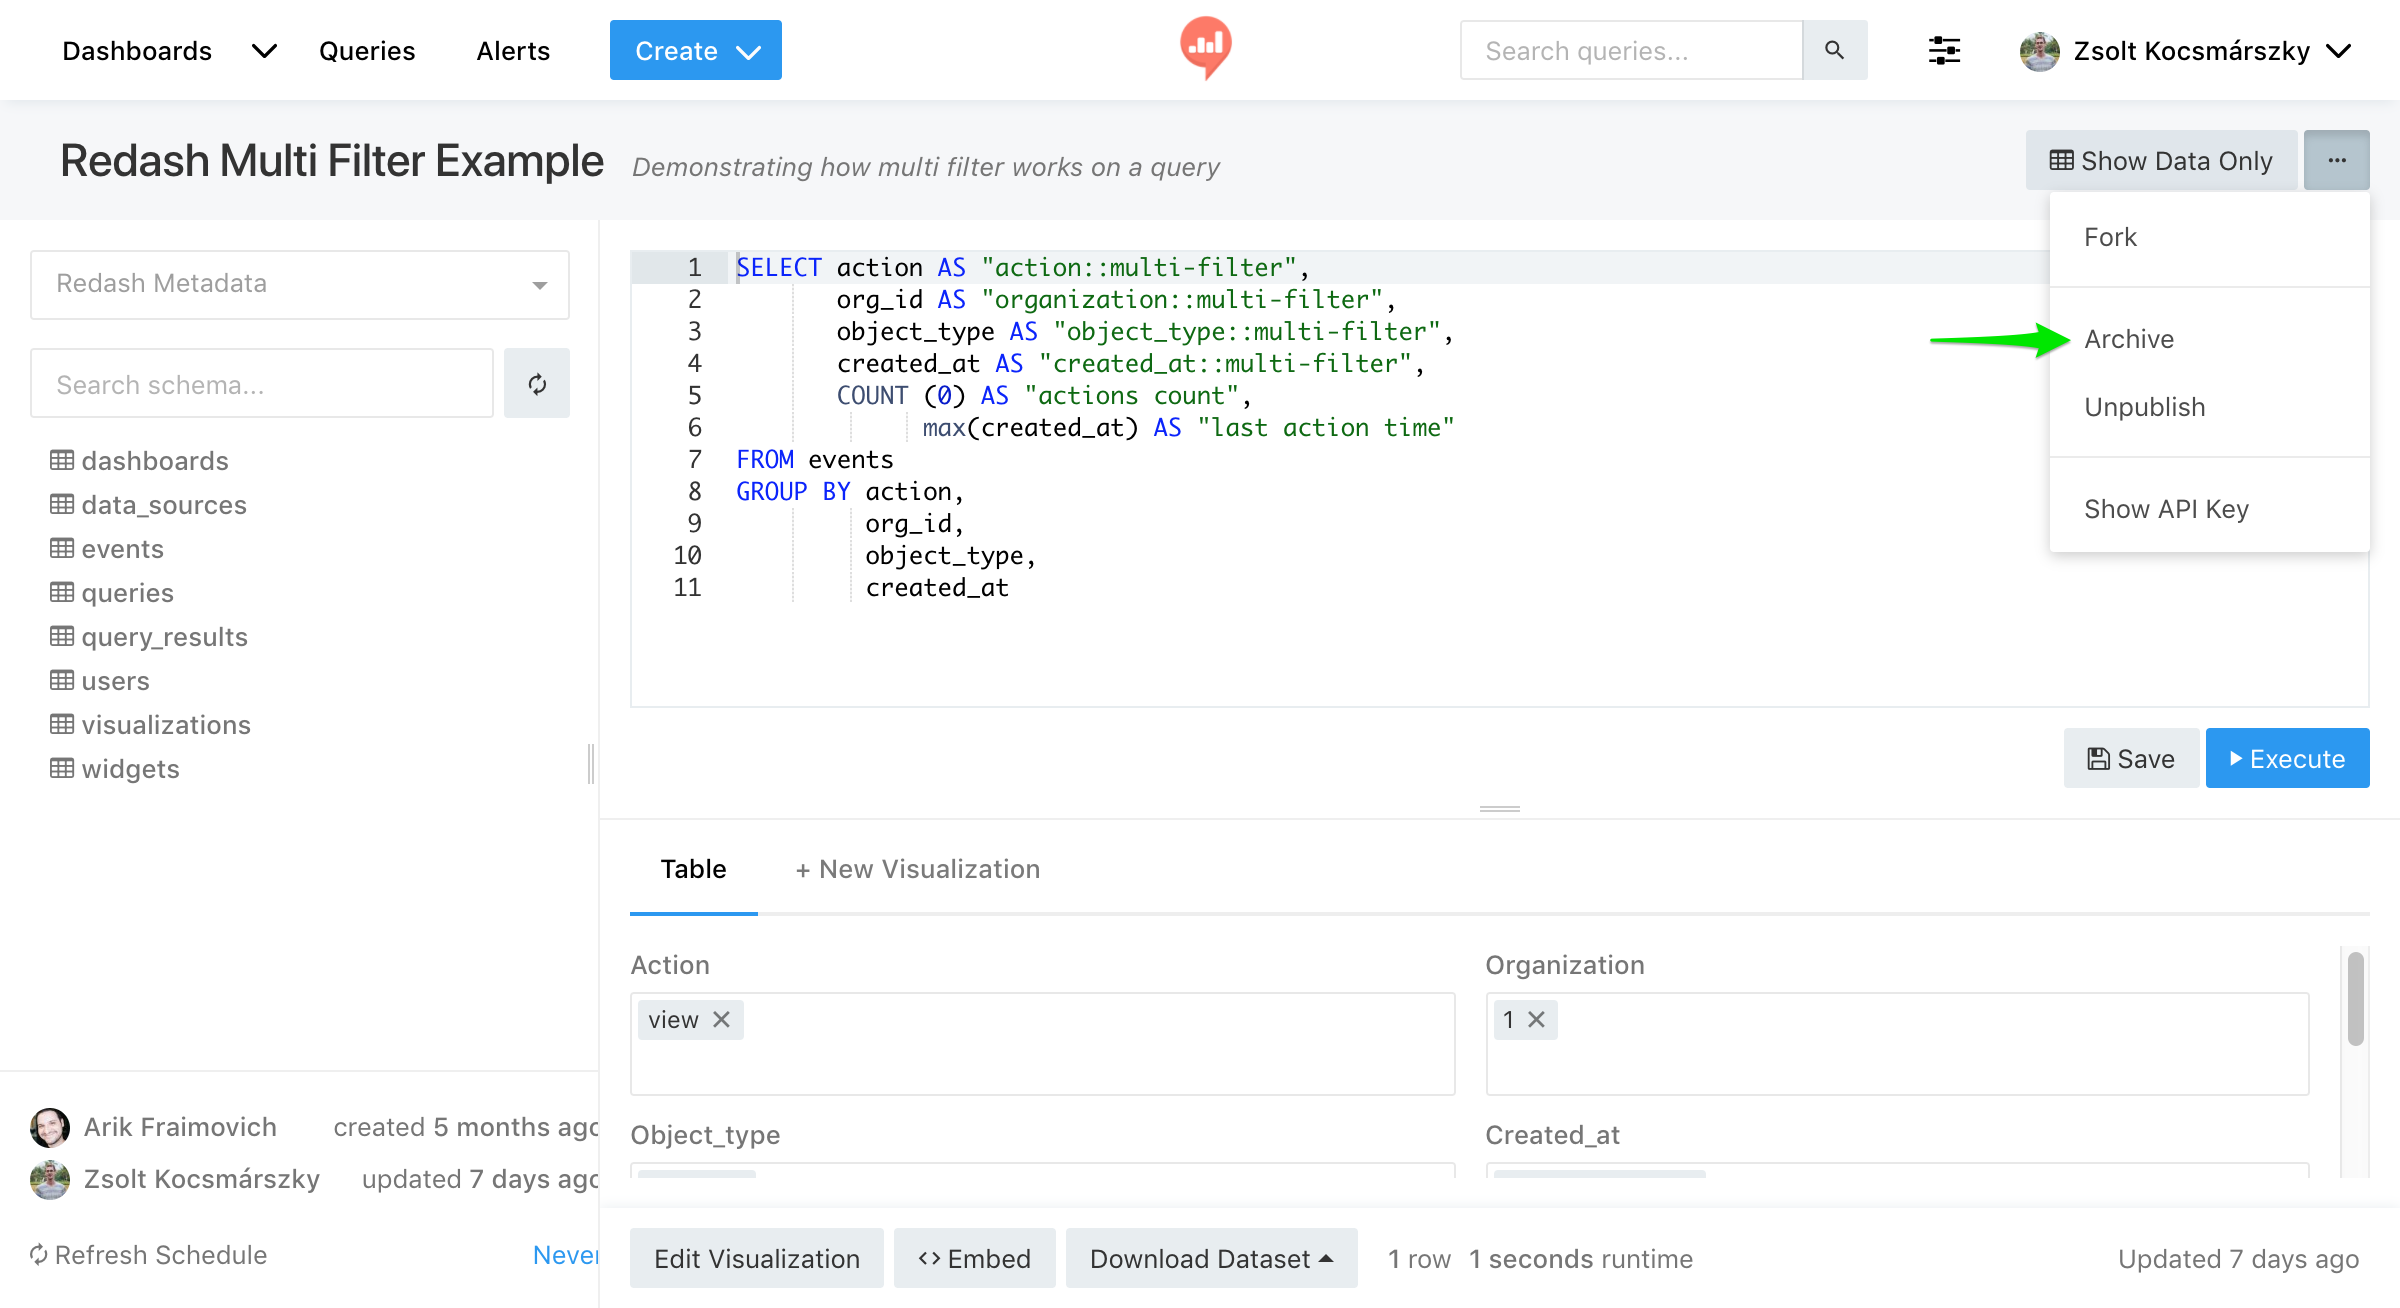
Archiving a Query
Once a query is no longer useful, you can archive it. Archiving is almost the same as deleting, except that direct links to the query will still work. To archive a query, open the little menu at the top-right area of the query editor, next to the Save button and click Archive.
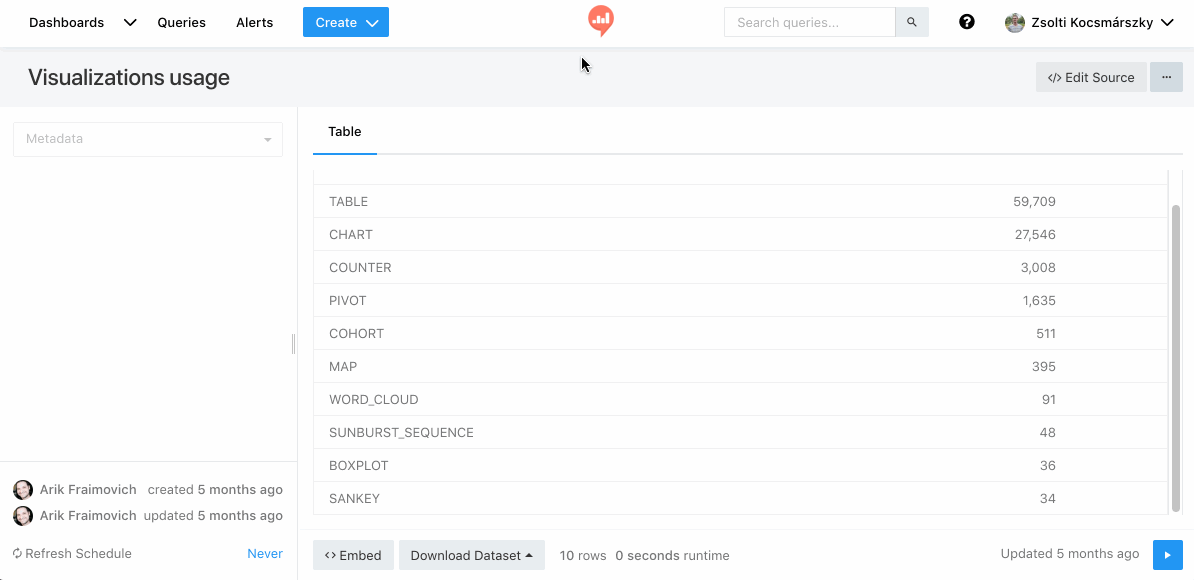
Duplicating (Forking) a Query
If you need to create a copy of an existing query (created by you or someone else), you can fork it. To fork a query, just click on the Fork button (see example below)
Managing Query Permissions
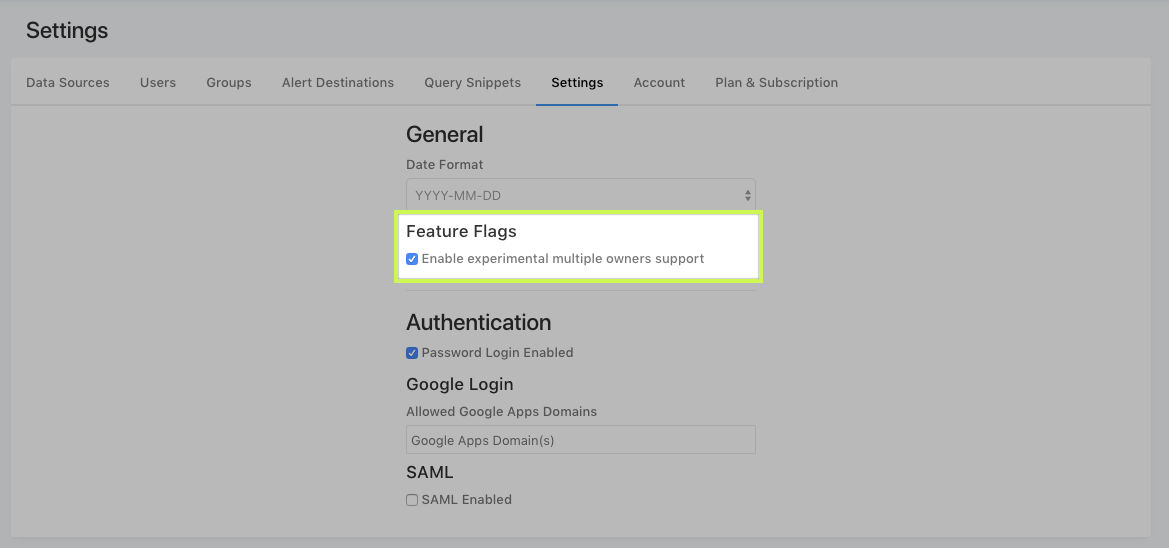
By default, saved queries can only be modified by the user who created them and members of the Admin group. But PayCore.Analytics includes experimental support to share edit permissions with non-Admin users. An Admin in your organization needs to enable it first. Open your organization settings and check the "Enable experimental multiple owners support"
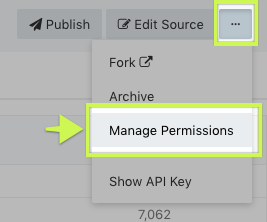
Now the Query Editor options menu includes a Manage Permissions option. Clicking on it it will open a dialog where you can add other users as editors to your query or dashboard.
Please note that currently the users you add won't receive a notification, so you will need to notify them manually.
Download or Export Query Results
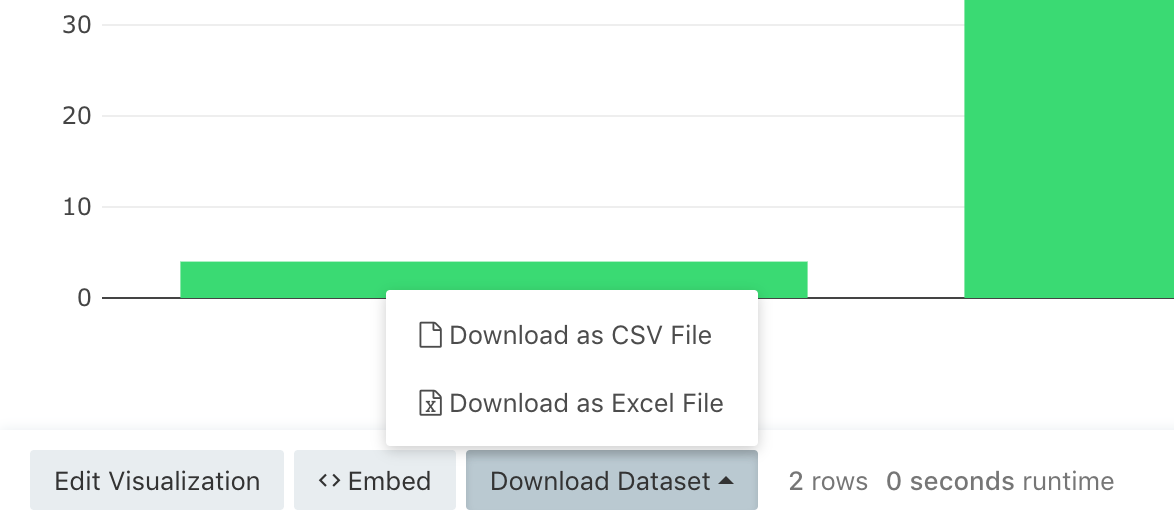
To manually download the query results, click the "Download Dataset" button above the results and select the type of file you'd like to download:
Export URLs and API Key
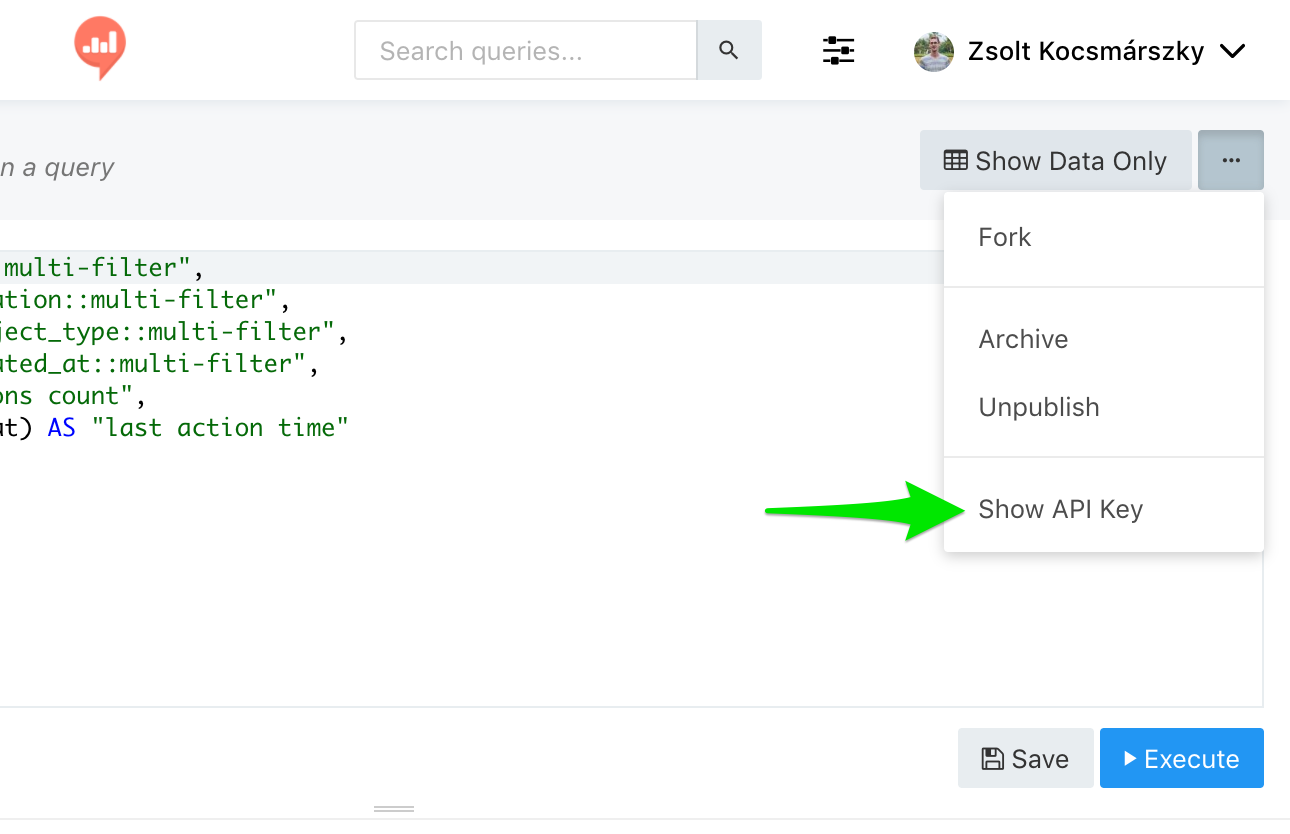
The Download Dataset URLs are direct links to the current query result you see on screen. To get a URL which always points at the latest query results, click on the "Show API Key" button in the query menu.
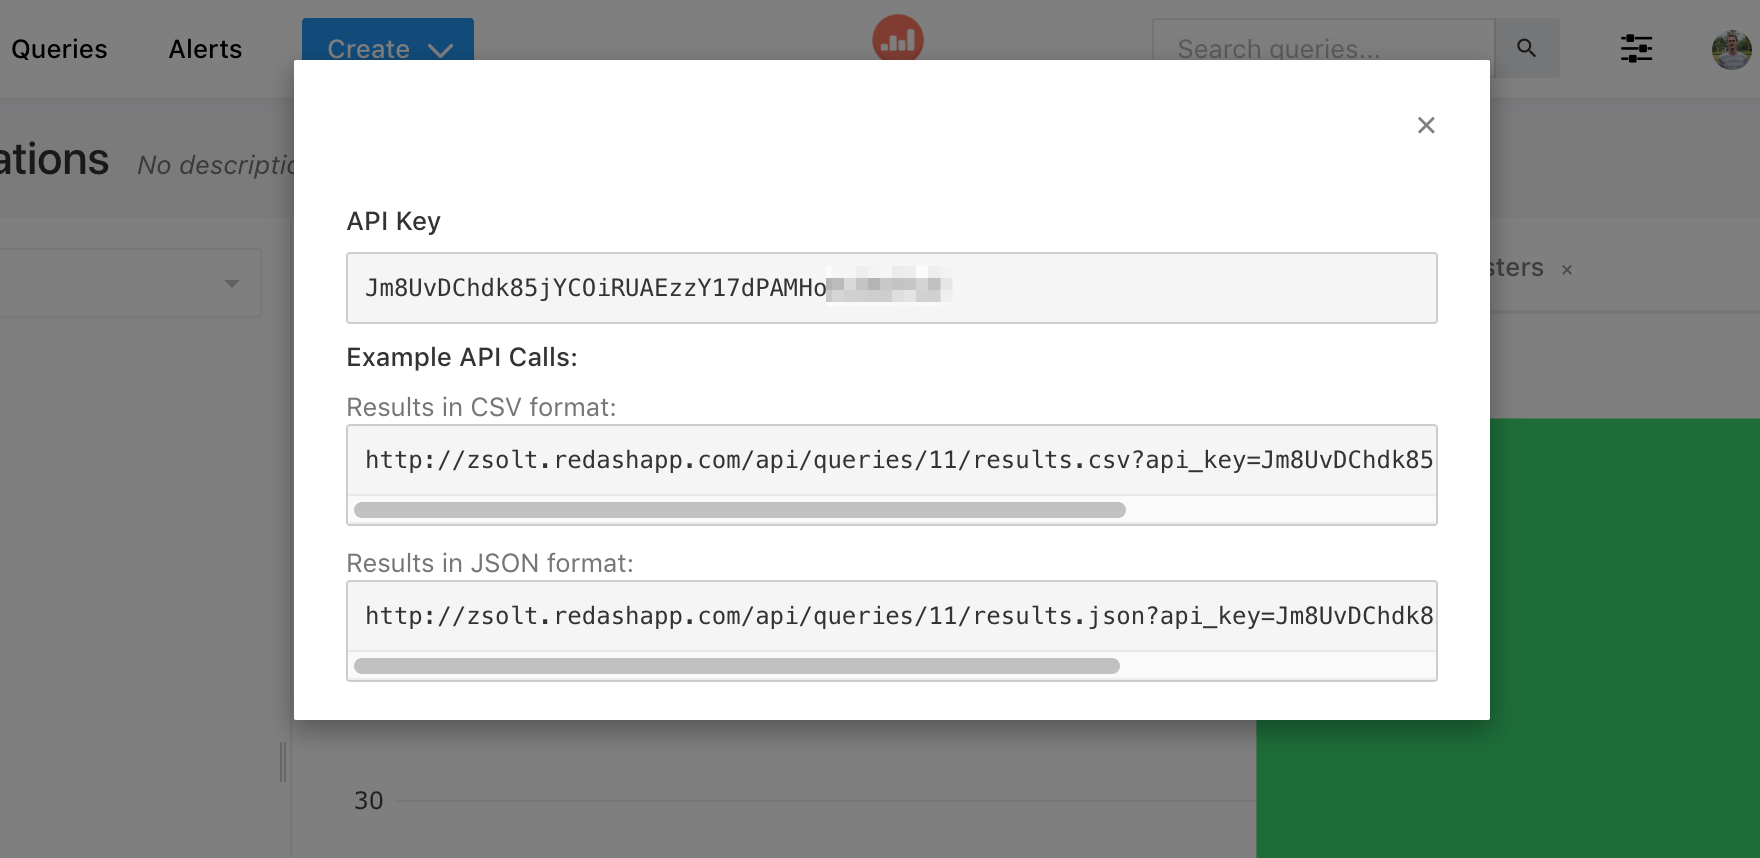
In the dialog that will open you will find:
- Query API key.
- Latest results URL in CSV and JSON format. You can also get the Excel format by changing the file type suffix from
json/csvtoxlsx.
Favorites & Tagging
PayCore.Analytics users write a lot of queries and dashboards! Favorites and Tagging are here to make finding them easy as your collection of queries and dashboards grows from a few hundred to a few thousand.
Favorites
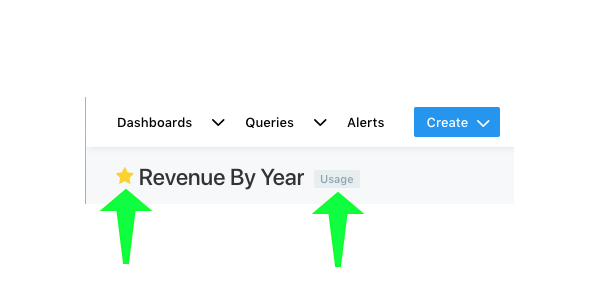
You can favorite a dashboard or query by clicking the star to the left of its title anywhere in PayCore.Analytics. The star will turn yellow to indicate success. Your favorites are displayed at several places in PayCore.Analytics. They appear on the homepage, in the navbar dropdown menus and as filters in the query or dashboard list views.
Tagging
You can tag queries and queries by subject matter, location, user or any parameter that is meaningful to your organization. Tags are added from the query editor or the dashboard editor. Hover your mouse on the query or dashboard title and an +Add Tag button will appear. In the modal that appears you can select as many tags as you need. The modal will suggest previously-used tags as you type. Hit Save when you're finished or ++Esc++ to abort tagging.
It's important to have predictable taxonomy for your tags. Consistency in this area makes using PayCore.Analytics an even nicer experience and helps bring new users onboard. So we recommend that your team have an internal discussion about the tag hierarchy that will be most beneficial to your organization.
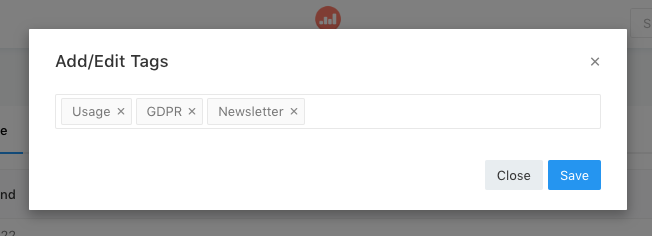
Your tags will appear on the Dashboard and Query list views on the right-hand side. Click any tag to filter the list view instantly. Click a second time to remove the filter. Shift + Click to select multiple filters.
Query Filters
PayCore.Analytics has filters for query results and visualizations! Thanks to filters, you can restrain the result to a specific or multiple values. Filters are enabled by following a naming convention for columns.
If you want to focus on a specific value, you'll need to alias your column to <columnName>::filter . Here's an example:
SELECT action AS "action::filter", COUNT(0) AS "actions count"
FROM events
GROUP BY action
Note that you can use __filter or __multiFilter, (double underscore instead of double quotes) if your database doesn’t support :: in column names (such as BigQuery).

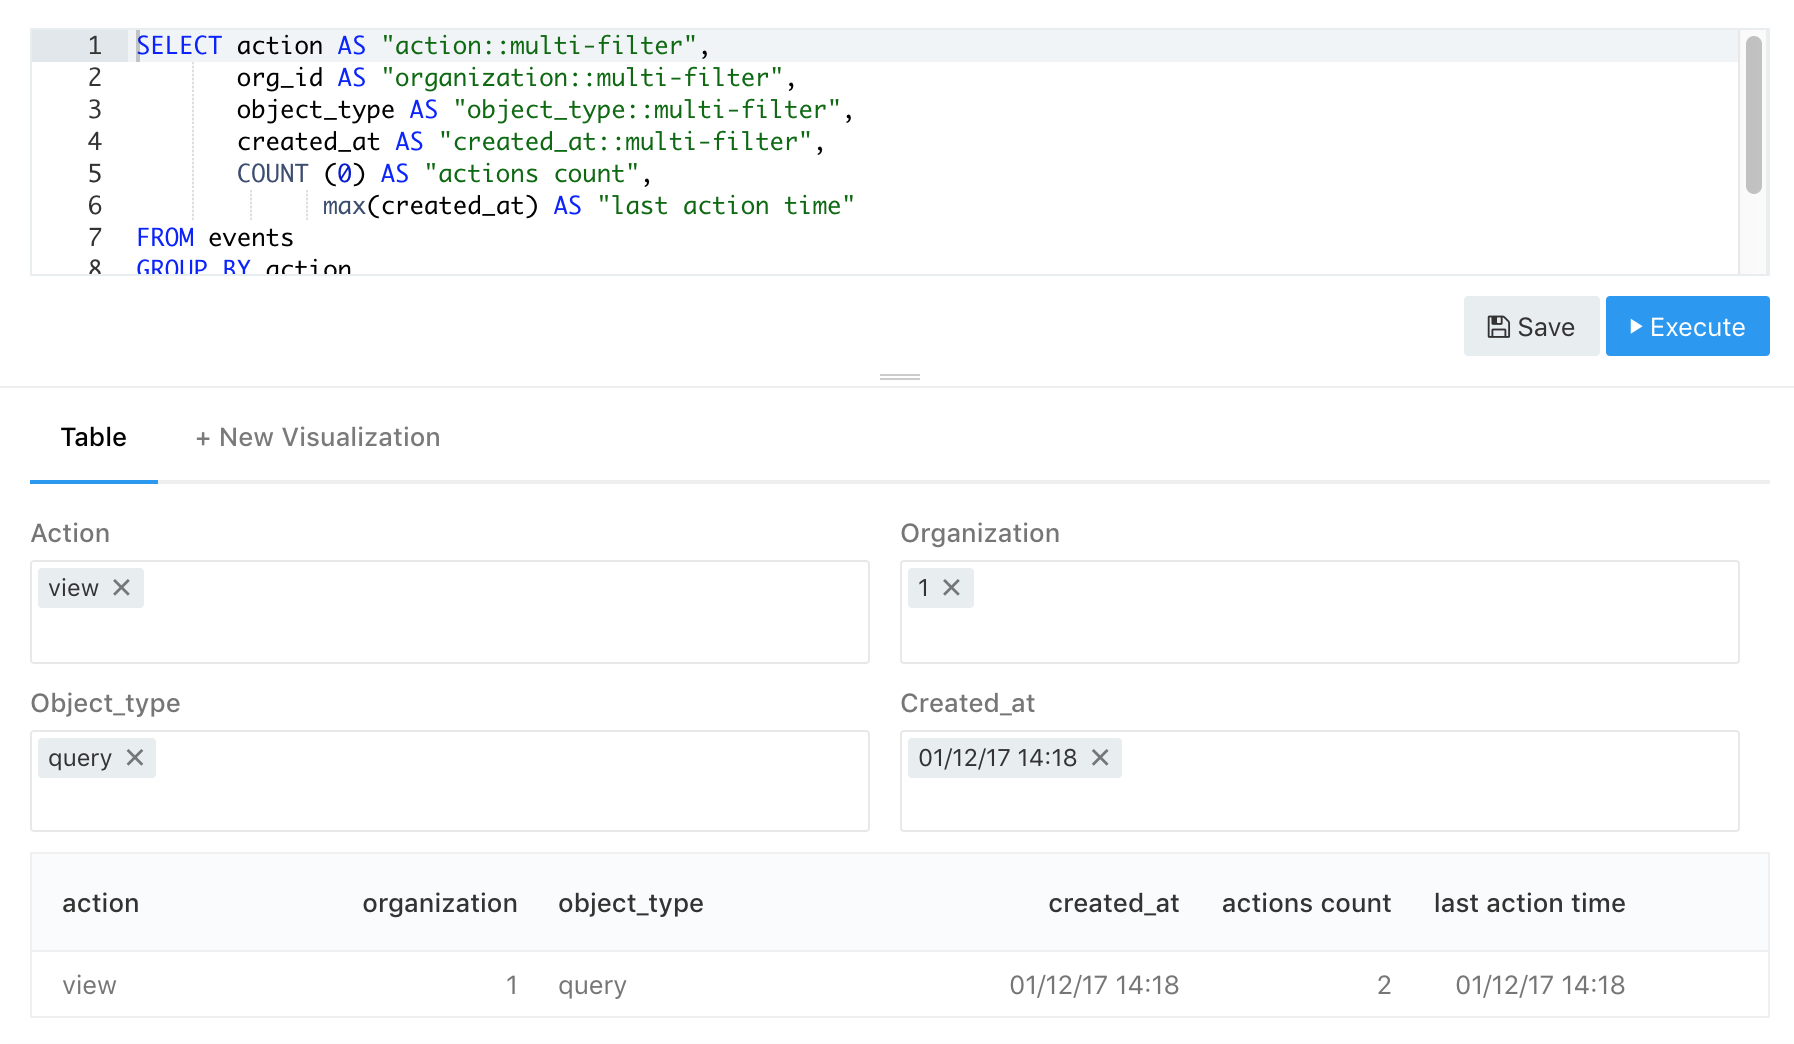
If you're interested in multi filters (meaning you can select multiple values), you will need to alias your column to <columnName>::multi-filter. Here's an example:
SELECT action AS "action::multi-filter", COUNT (0) AS "actions count"
FROM events
GROUP BY action
Query Parameters
Unless specific to a one-time project, most queries can be reused by changing a WHERE clause (or filter block in NoSQL) to suit the present need. Yet it can be a hassle to Edit Source every time you make a minor change. Query Parameters let you insert values at run time without editing your base query. The syntax is straightforward: PayCore.Analytics recognizes any string between double curly braces {{ }} as a Query Parameter.
SELECT count(0)
FROM events
WHERE action = ''
In the above example `` is the Query Parameter. To change the value of the parameter, PayCore.Analytics places an input box above the results pane. The contents of this input box are passed to the database instead of the double curly braces whenever you execute the query.
Creating and Editing Queries
To make a new query, click Create in the navbar then select Query.
Query Editor
Query Syntax
In most cases we use the query language native to the data source. In some cases there are differences or additions, which are documented on the page. PayСore.Analytics uses SQL (Structured Query Language) for creating queries.
Keyboard Shorcuts
- Execute query:
Ctrl/Cmd+Enter - Save query:
Ctrl/Cmd+S - Toggle Auto Complete:
Ctrl+Space - Toggle Schema Browser
Alt/Option+D
Schema Browser
To the left of the query editor, you will find the Schema Browser:

The schema browser will list all your tables, and when clicking on a table will show its columns. To insert an item into your query, simply click the double arrow on the right side. You can filter the schema with the search box and refresh it by clicking on the refresh button (otherwise it refreshes periodically in the background).
Please note that not all data source types support loading the schema.
You can hide the Schema Browser using the key shortcut or by double-clicking the pane handle on the interface. This can be useful when you want to maximize screen realestate while composing a query.
Auto Complete
The query editor also includes an Auto Complete feature that makes writing complicated queries easier. Live Auto Complete is on by default. So you will see table and column suggestions as you type. You can disable Live Auto Complete by clicking the lightning bolt icon beneath the query editor. When Live Auto Complete is disabled, you can still activate Auto Complete by hitting CTRL + Space.
Live Auto Complete is enabled by default unless your database schema exceeds five thousand tokens (tables or columns). In such cases, you can manually trigger Auto Complete using the keyboard shortcut.
Auto Complete looks for schema tokens, query syntax identifiers (like SELECT or JOIN) and the titles of Query Snippets.
Query Settings
Published vs Unpublished Queries
By default each query starts as an unpublished draft, which means that:
- Only the user who created this query can see it in the "All Queries" list or in search results.
- You can't add visualizations from an unpublished query to dashboards or use it in alerts.
To publish a query, give it a name or click the Publish button. It's also possible to unpublish a published query by clicking on the Unpublish button in the query menu.
Archiving a Query
Once a query is no longer useful, you can archive it. Archiving is almost the same as deleting, except that direct links to the query will still work. To archive a query, open the little menu at the top-right area of the query editor, next to the Save button and click Archive.
Duplicating (Forking) a Query
If you need to create a copy of an existing query (created by you or someone else), you can fork it. To fork a query, just click on the Fork button (see example below)
Managing Query Permissions
By default, saved queries can only be modified by the user who created them and members of the Admin group. But PayCore.Analytics includes experimental support to share edit permissions with non-Admin users. An Admin in your organization needs to enable it first. Open your organization settings and check the "Enable experimental multiple owners support"
Now the Query Editor options menu includes a Manage Permissions option. Clicking on it it will open a dialog where you can add other users as editors to your query or dashboard.
Please note that currently the users you add won't receive a notification, so you will need to notify them manually.
Download or Export Query Results
To manually download the query results, click the "Download Dataset" button above the results and select the type of file you'd like to download:
Export URLs and API Key
The Download Dataset URLs are direct links to the current query result you see on screen. To get a URL which always points at the latest query results, click on the "Show API Key" button in the query menu.
In the dialog that will open you will find:
- Query API key.
- Latest results URL in CSV and JSON format. You can also get the Excel format by changing the file type suffix from
json/csvtoxlsx.
Favorites & Tagging
PayCore.Analytics users write a lot of queries and dashboards! Favorites and Tagging are here to make finding them easy as your collection of queries and dashboards grows from a few hundred to a few thousand.
Favorites
You can favorite a dashboard or query by clicking the star to the left of its title anywhere in PayCore.Analytics. The star will turn yellow to indicate success. Your favorites are displayed at several places in PayCore.Analytics. They appear on the homepage, in the navbar dropdown menus and as filters in the query or dashboard list views.
Tagging
You can tag queries and queries by subject matter, location, user or any parameter that is meaningful to your organization. Tags are added from the query editor or the dashboard editor. Hover your mouse on the query or dashboard title and an +Add Tag button will appear. In the modal that appears you can select as many tags as you need. The modal will suggest previously-used tags as you type. Hit Save when you're finished or Esc to abort tagging.
It's important to have predictable taxonomy for your tags. Consistency in this area makes using PayCore.Analytics an even nicer experience and helps bring new users onboard. So we recommend that your team have an internal discussion about the tag hierarchy that will be most benefecial to your organization.
Your tags will appear on the Dashboard and Query list views on the righthand side. Click any tag to filter the list view instantly. Click a second time to remove the filter. Shift + Click to select multiple filters.
Query Filters
PayCore.Analytics has filters for query results and visualizations! Thanks to filters, you can restrain the result to a specific or multiple values. Filters are enabled by following a naming convention for columns.
If you want to focus on a specific value, you'll need to alias your column to <columnName>::filter . Here's an example:
SELECT action AS "action::filter", COUNT(0) AS "actions count"
FROM events
GROUP BY action
Note that you can use __filter or __multiFilter, (double underscore instead of double quotes) if your database doesn’t support :: in column names (such as BigQuery).
If you're interested in multi filters (meaning you can select multiple values), you will need to alias your column to <columnName>::multi-filter. Here's an example:
SELECT action AS "action::multi-filter", COUNT (0) AS "actions count"
FROM events
GROUP BY action
Query Parameters
Unless specific to a one-time project, most queries can be reused by changing a WHERE clause (or filter block in NoSQL) to suit the present need. Yet it can be a hassle to Edit Source every time you make a minor change. Query Parameters let you insert values at run time without editing your base query. The syntax is straightforward: PayCore.Analytics recognizes any string between double curly braces {{ }} as a Query Parameter.
SELECT count(0)
FROM events
WHERE action = ''
In the above example `` is the Query Parameter. To change the value of the parameter, PayCore.Analytics places an input box above the results pane. The contents of this input box are passed to the database instead of the double curly braces whenever you execute the query.
Add A Parameter From The UI
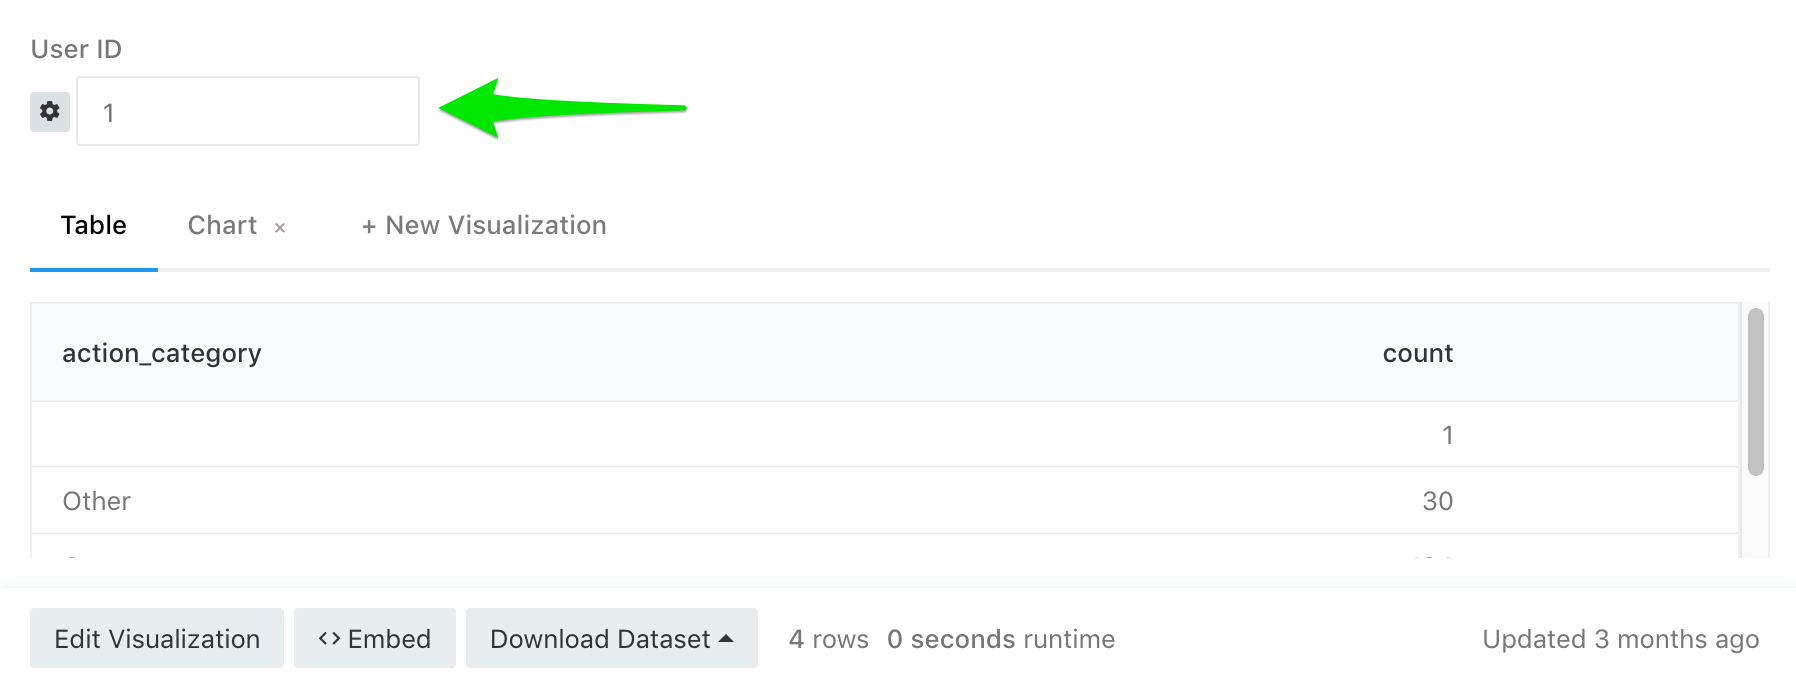
You can insert a parameter into your query and immediately activate its settings pane by using the Add Parameter button or associated keyboard shortcut. The parameter will be inserted wherever the text caret appears in your query. If you find that you've inserted the parameter in the wrong part of the query, you can select the entire parameter (including the curly braces!) and cut/paste it wherever necessary.
You can discover the key shortcut on your operating system by hovering your cursor above the Add Parameter button.
Parameter Settings
You can open a parameter's settings pane by clicking the cog icon on the left:

- Title : by default the parameter title will be the same as the keyword in the query text. If you want to give it a friendlier name, you can change it here.
- Type : each parameter starts as a Text type. Supported types are Text, Number, Date, Date and Time, Date and Time (with Seconds), and Dropdown List.
Prior to PayCore.Analytics version 7, the parameter settings pane in the Query Editor included a Globaltickbox, which notified PayCore.Analytics that you intended to use this parameter across multiple widgets in a dashboard. The Global tickbox has been replaced since version 6 with the new Parameter Mapping on Dashboards functionality described below.
Query Parameters only work within PayCore.Analytics and are not supported in embeds or shared dashboards. Also, a PayCore.Analytics user must have Full Access permission to the data source to use Query Parameters.
Date Parameters
With many databases, you can use a string value to represent a date/time which is equivalent to a Text parameter in PayCore.Analytics. PayCore.Analytics's Date parameters are preferable because they have a special calendar interface to make choosing a date easy. If you know in advance, however, that your date parameters will always come from a short list, you can instead use the Dropdown List or Query Based Dropdown List type.
If you are using Query Parameters of type Date, you can set the parameter's default value to the current date and time when the query is run. While most databases include functions for querying with the current date/time (GETDATE() in TSQL or CURRENT_DATE in MySQL e.g.), this feature in PayCore.Analytics lets you run the same query either up-to-the-minute or further in the past.
Date Range Parameters
For queries that must select data between two dates, PayCore.Analytics provides three levels of Date / Time Range parameters. When chosen from the parameters settings screen, PayCore.Analytics places two complete parameters into your query: one for the start date and one for the end date. You will typically need to separate them in your query (into different WHERE clauses, e.g.). However, the parameter selection interface below the query window displays a unified widget to easily chose a date range without unnecessary clicking.
Date Range parameters behave exactly like Date parameters but are meant to save you time.
Dropdown Lists
If you want to restrict the scope of possible parameter values when running a query, you can use PayCore.Analytics's Dropdown List parameter type. When selected from the parameter settings panel, a text box appears where you can enter your allowed values, each one separated by a new line. Dropdown lists are Text parameters under the hood, so if you want to use dates/datetimes in your dropdown, you should enter them in the format your data source requires.
Query Based Dropdown List
Dropdown lists can also be tied to the results of an existing query. Just click Query Based Dropdown List under Type in the settings panel. Search for your target query in the Query to load dropdown values from bar. Performance will degrade if your target query returns a large number of records.
If your target query returns more than one column, PayCore.Analytics uses the first one. If your target query returns name and value columns, PayCore.Analytics populates the parameter selection widget with the namecolumn but executes the query with the associated value.
For example, suppose this query:
SELECT user_uuid as 'value', username as 'name' FROM users
returned this data:
| value | name |
|---|---|
| 1001 | John Smith |
| 1002 | Jane Doe |
| 1003 | Bobby Tables |
PayCore.Analytics's dropdown list widget would look like this:
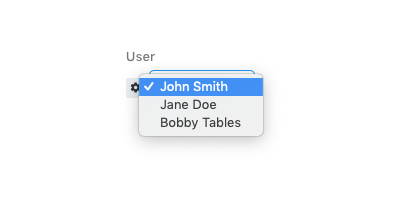
But when PayCore.Analytics executes the query, the value passed to the database would be 1001, 1002 or 1003.
FAQ
Can I reuse the same parameter multiple times in a single query?
Sure! Just use the same identifier in the curly brackets. In this example:
SELECT , count(0)
FROM queries
WHERE org_id =
We use the `` parameter twice.
Can I use multiple parameters in a single query?
Of course, just use a unique name for each one. In this example:
SELECT count(0)
FROM queries
WHERE org_id =  AND created_at > ''
We use two parameters: and.
Parameter Mapping on Dashboards
This is currently available on PayCore.Analytics and is part of the next Open Source release (v7.0).
Query Parameters can also be powerfully controlled within dashboards. You can link together parameters on different widgets, set static parameter values, or choose values individually for each widget.
You select your desired parameter mapping when adding dashboard widgets that depend on a parameter value. Each parameter in the underlying query will appear in the Parameters list.
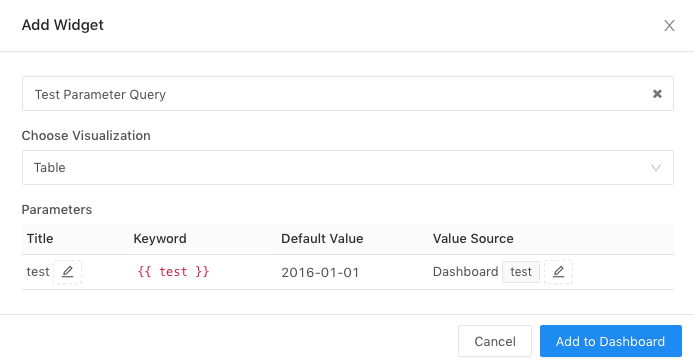
You can also access the parameter mapping interface by clicking the three dots on the top right of a dashboard widget, then clicking Edit Parameters.
-
Title is the display name for your parameter and will appear beside the value selector on your dashboard. It defaults to the parameter keyword (see next bullet). Edit it by clicking the pencil glyph. Note that a titles are not displayed for static dashboard parameters because the value selector is hidden. If you select
Static valueas your Value Source then the Title field will be grayed out. -
Keyword is the string literal for this parameter in the underlying query. This is useful for debugging if your dashboard does not return expected results.
-
Default Value is what PayCore.Analytics will use if no other value is specified.
-
Value Source is where you choose your preferred mapping. Click the pencil glyph to open the mapper settings.
Value Source Options
-
New dashboard parameter: Dashboard parameters allow you to set a parameter value in one place on your dashboard and map it to multiple visualizations. Use this option to create a new dashboard-level parameter.
-
Existing dashboard parameter: If you have already set up a dashboard-level parameter, use this option to map it to a specific query parameter. You will need to specify which pre-existing dashboard parameter will be mapped.
-
Widget parameter: This option will display a value selector inside your dashboard widget. This is useful for one-off parameters that are not shared between widgets.
-
Static value: Selecting this option will let you choose a static value for this widget, regardless of the values used on other widgets. Statically mapped parameter values do not display a value selector anywhere on the dashboard which is more compact. This lets you take advantage of the flexibility of Query Parameters without cluttering the user interface on a dashboard when certain parameters are not expected to change frequently.
Query Snippets
Copy and Paste are a big part of composing database queries. Because it's much easier to duplicate prior work than to write it from scratch. This is particularly true for common JOIN statements or complex CASE expressions. As your list of queries in PayCore.Analytics grows, however, it can be difficult to remember which queries contain the statement you need right now. Enter Query Snippets.
Query Snippets are segments of queries that your whole team can share and trigger via auto complete. You create them at Settings -> Query Snippets.

Here's an example for a simple snippet:
JOIN organizations org ON org.id = ${1:table}.org_id
Insertion Points
${1:table} is an insertion point with placeholder text. When PayCore.Analytics renders the snippet, the dollar sign $ and curly braces {} will be stripped away and the word table will be highlighted for the user to replace.
You can use the placeholder text as a desirable default value for the user to override at runtime.
You designate insertion points by wrapping an integer tab order with a single dollar sign and curly braces ${}. A text placeholder preceded by a colon : is optional but useful for users unfamiliar with your snippet.
When PayCore.Analytics renders this snippet:
AND (invoices.complete IS NULL OR invoices.complete <> '${2}')
AND (invoices.canceled IS NULL OR invoices.canceled <> '${1}')
AND (invoices.modified IS NULL OR invoices.modified_date <> '${0: this_date}')
The text insertion carat will jump to the second line between the quote marks ''. When the user presses Tab the carat will jump backwards onto the first line. When the user presses Tab again, the carat will jump to the third line and this_date will be highlighted to prompt the user for the desired value.
An insertion point of zero ${0} is always the last point in the tab order.
Insert A Query Snippet
If you have Live Auto Complete enabled, you can invoke your snippet from the Query Editor by typing the trigger word you defined in the Query Snippet editor. Auto Complete will suggest it like any other keyword in your database.
If you prefer to work without Live Auto Complete enabled you can still invoke Query Snippets by pressing CTRL + Space and typing the trigger word for your Query Snippet.
Here are some other ideas for snippets:
- Frequent
JOINstatements - Complicated clauses like
WITHorCASE. - Conditional Formatting